
Planning and installing a reliable campervan electrical panel system layout is essential for anyone looking to live or travel in a van. From powering lights and refrigerators to charging devices and running appliances, the electrical system is the heart of your mobile lifestyle. This comprehensive guide covers everything from system design to installation, wiring diagrams, and maintenance.
Introduction to Campervan Electrical Panel System Layout
A well-thought-out campervan electrical panel system layout is crucial for safe, efficient, and scalable power management in a van conversion. The layout impacts system performance, future upgrades, and ease of troubleshooting. By organizing your panel with logical placement, appropriate spacing, and clear labeling, you’ll reduce fire hazards and simplify maintenance.
Overview of Campervan Electrical Panel System Layout Components
A complete campervan electrical system consists of several integrated components:
- Battery bank: Stores power. Lithium (LiFePO4) batteries are popular for their longevity and efficiency.
- Charge sources: Solar panels (with an MPPT charge controller), shore power, and alternator charging.
- Inverter: Converts 12V DC to 120V AC to power standard appliances.
- DC fuse block: Distributes 12V power to devices like lights, fans, and water pumps.
- AC breaker panel: Protects and distributes 120V AC circuits.
- Bus bars: Provide central points for positive and negative connections.
These components are mounted on a system board—usually a piece of plywood—secured in a cabinet or under a bed.
Designing Your Campervan Electrical Panel Layout
Designing the layout requires planning for space, accessibility, airflow, and future expansion. The system board should be mounted on plywood and spaced slightly from the van wall to allow ventilation and wire routing.
Key considerations:
- Group DC and AC systems separately
- Use insulated cable glands for wire entry
- Place fuse blocks and bus bars where they’re easy to inspect
- Allow enough space for additional circuits or upgrades
- Leave gaps between components to reduce heat buildup
Pre-planning the layout also ensures wires are kept short (to reduce voltage drop) and neat.
Wiring Diagrams & Electrical Panel System Layout Examples
A wiring diagram simplifies the complexity of your setup. A basic layout looks like this:
Battery Bank → Bus Bars → Fuse Blocks / Breaker Panels → Appliances
In a split system:
- The DC fuse block connects to lights, fans, fridge, and USB ports
- The inverter connects to an AC breaker panel, powering outlets and devices like laptops or a blender
- Solar panels go to an MPPT controller, which feeds the battery bank
Examples:
- DC Panel Layout: Compact distribution with 12V fuses, switches, and status LEDs
- AC Panel Layout: Breakers for shore power, inverter feed, and safety devices like GFCI
Sizing Components for Your Electrical Panel Layout
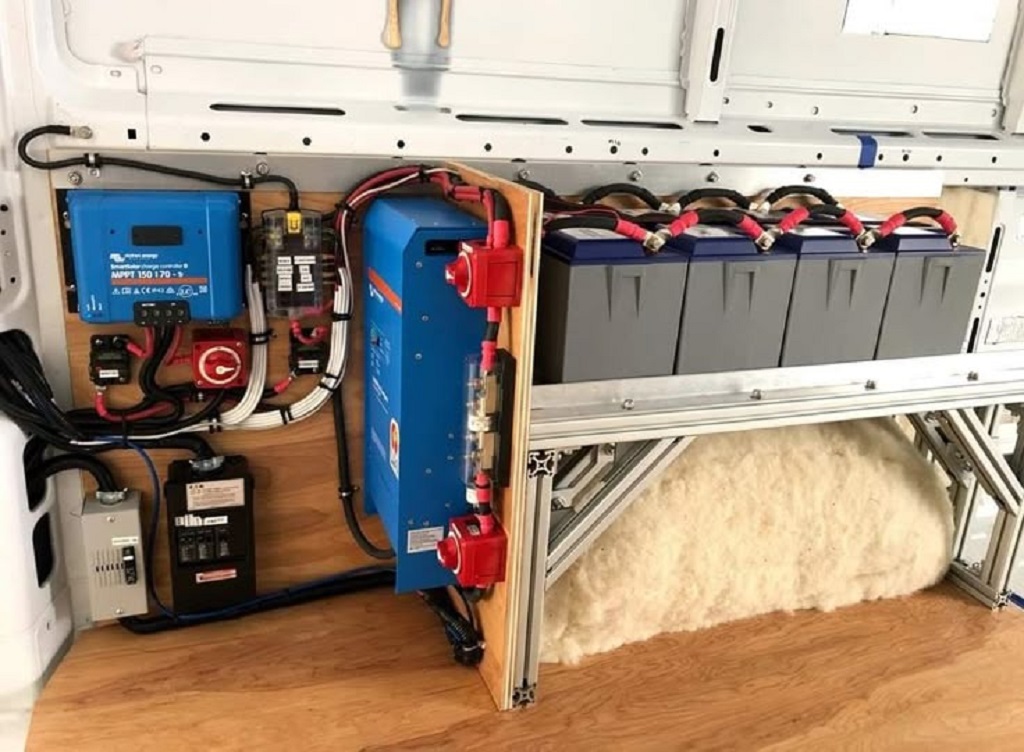
Selecting the correct wire size, fuses, and breakers ensures safe operation.
Cable Sizing
- Use a voltage drop calculator to determine wire gauge
- Keep wires as short as possible
- Common sizes: 14 AWG for lights, 10 AWG for fridges, 4 AWG+ for battery cables
Fuse & Breaker Selection
- Fuse should be rated 25% higher than the load’s draw, but less than the wire’s ampacity
- Use ANL fuses or circuit breakers for battery protection
Ventilation & Space
- Components like inverters and charge controllers produce heat—don’t cram them together
Installing the Campervan Electrical Panel System Layout
Installation should follow a logical sequence:
- Mount the system board
- Attach the bus bars, fuse blocks, inverter, and other components
- Run wires through glands or trunking to devices
- Label everything clearly
- Connect battery cables last
Tips:
- Secure cables with P-clips or adhesive mounts
- Use heat shrink and crimp connectors for solid connections
- Keep shore power and inverter AC lines isolated
Organizing Cable Management in Panel Layout
Good cable management isn’t just for aesthetics—it prevents overheating and improves safety.
Options:
- Trunking: Plastic or aluminum channels for hiding and routing cables
- Through-panel wiring: Drilling through the system board and routing cables behind
Best practices:
- Use color-coded wire where possible
- Label both ends of every wire
- Group cables by system: solar, DC loads, AC outputs, etc.
- Bundle with zip ties but don’t overtighten
Testing & Troubleshooting Your Electrical Panel Layout
Before powering on:
- Use a multimeter to test continuity and polarity
- Confirm secure crimps and terminal torque
- Check battery monitor or BMS for abnormalities
Troubleshooting tips:
- Fuse blown? Trace the line for shorts or overloads
- Inverter not turning on? Check voltage at the terminals
- Device not powered? Inspect fuse block and switch connections
Maintenance & Safety for Your Electrical Panel Layout
Maintain performance and prevent issues with regular checks:
- Inspect terminals for corrosion and tightness every 3-6 months
- Clean dust and debris around inverters and controllers
- Monitor battery health via BMS or monitor
- Plan expansion room in fuse blocks and bus bars
Safety tips:
- Never work on live circuits
- Always disconnect battery before servicing
- Use flame-retardant wire sleeving if near heat sources
FAQs: Campervan Electrical Panel System Layout
How do I wire a campervan electrical panel system layout?
Use a diagram to route power from the battery through bus bars, fuses, and breakers to your devices. Separate AC and DC sides, label wires, and follow safety codes.
What components are needed in a campervan electrical panel layout?
At minimum: batteries, charge controller, inverter, bus bars, fuse block (DC), breaker panel (AC), and wiring accessories.
How do I size wires and fuses in my campervan electrical panel?
Use a voltage drop calculator, check the amp draw of devices, and select fuses based on both load and wire size.
Conclusion
Designing a campervan electrical panel system layout takes careful planning, precision, and a clear understanding of your power needs. A clean layout improves safety, troubleshooting, and system lifespan. Whether you’re off-grid or plugged in at a campground, your electrical system is the foundation of vanlife comfort.
With this guide, you now have the blueprint to build a reliable, safe, and expandable campervan electrical panel system layout tailored to your mobile lifestyle.