
A working water pump is one of the most important parts of your motorhome. It delivers water to your sink, shower, and toilet whenever you are off the grid. However, like any mechanical part, it can fail at the worst possible moment. A pump that dies in a remote campsite leaves you without running water for days.
That is why installing a backup motorhome water pump is such a smart move. It gives you peace of mind on long trips and keeps your water system running even when your primary pump gives out. Therefore, this guide will walk you through the entire process step by step. Whether you are a beginner or a seasoned DIYer, you will find everything you need right here.
Why Every Motorhome Needs a Backup Water Pump
Most motorhome owners never think about their water pump until it stops working. The primary pump runs every time you turn on a tap. Over time, the motor wears out, the diaphragm cracks, or the pressure switch fails. When it does, you are left with no water pressure and a very uncomfortable trip.
A backup pump does not have to run all the time. It simply sits ready to take over when the primary pump fails. Additionally, a backup system is invaluable during maintenance. If you need to remove and repair your main pump, the backup keeps water flowing in the meantime.
Furthermore, motorhome travel often takes you far from service centers. In remote areas, a failed pump can end your trip entirely. Therefore, having a backup installed is not just a convenience. It is a genuine emergency measure that protects your investment and your comfort.
Understanding How a Motorhome Water Pump Works
Before you install a backup pump, it helps to understand how the system works. Most motorhomes use a 12-volt DC demand pump. This type of pump turns on automatically when it senses a drop in water pressure. When you open a tap, pressure drops, the pump activates, and water flows. When you close the tap, pressure builds back up and the pump shuts off.
The pump connects to three main systems. These are the 12-volt electrical system, the fresh water tank, and the pressurized water lines that run to your fixtures. Additionally, most pumps include a built-in pressure switch and a check valve to prevent backflow.
A backup pump works in exactly the same way. However, it is installed in parallel with the primary pump. This means both pumps share the same water inlet and outlet lines. When the primary pump fails, you simply switch to the backup. The transition takes seconds.
Gathering the Tools and Materials You Will Need
Good preparation makes the installation go smoothly. Before you start, gather all the tools and materials listed below. Having everything on hand prevents delays and keeps the job organized.
Tools Required
- Adjustable wrench and pipe wrench
- Screwdrivers, both flathead and Phillips
- Wire stripper and crimping tool
- Drill with assorted bits
- Utility knife
- Teflon tape
- Zip ties and cable clips
- Multimeter for testing electrical connections
Materials Required
- A 12-volt demand water pump rated for your system pressure (typically 35 to 55 PSI)
- Lengths of half-inch or three-eighths-inch fresh water hose to match your existing lines
- Hose barb fittings and clamps
- A manual or automatic transfer switch
- Appropriately rated 12-volt wire (usually 14 or 16 gauge)
- Inline fuse holder and fuse rated to your pump
- Mounting screws and a small piece of rubber or foam for vibration dampening
- Tee fittings to connect into existing water lines
Additionally, check your motorhome manual or the primary pump label to confirm the exact pressure and flow rate specifications. Your backup pump should match or closely exceed these values. This ensures it can handle the full demand of your water system.
Choosing the Right Location for Your Backup Pump
Location matters a great deal when installing a backup pump. The ideal spot is close to your primary pump. This keeps the plumbing connections short and simple. It also makes it easy to switch between pumps when needed.
However, you need to make sure the location is accessible. You will need to reach the pump for maintenance and occasional inspection. Avoid tucking it into a space where you cannot get to it without removing other components.
Additionally, consider vibration and noise. Water pumps vibrate when they run. Mounting your pump on a hard surface without any dampening will transmit that vibration through the floor and walls of your motorhome. Therefore, always mount the pump on a rubber or foam pad. This reduces noise significantly and protects the pump from stress cracks caused by constant vibration.
Finally, ensure the location stays dry. Water pumps are designed to move water through them, but the motor housing itself should not get wet. Avoid areas prone to condensation, leaks from other plumbing, or splashback.
Step-by-Step Installation Guide
Step 1: Turn Off the Water Supply and Power
Safety comes first. Start by emptying or isolating your fresh water tank. You can do this by opening all the taps in your motorhome and letting the pressure drop naturally. Once the water stops flowing, close all the taps.
Next, disconnect the 12-volt power supply to the water system. Locate the fuse or circuit breaker for the primary pump and switch it off. Additionally, disconnect the negative terminal from your coach battery if you want to be extra cautious. Never work on live 12-volt wiring without taking this precaution.
Step 2: Install Tee Fittings in the Water Lines
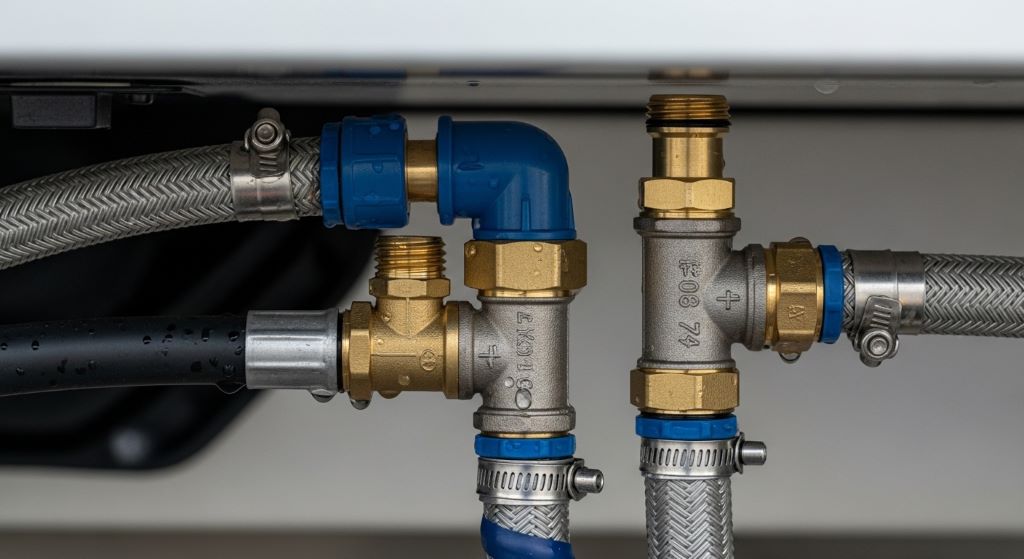
Your backup pump needs to tap into the existing water lines. You will do this by cutting into the inlet and outlet lines of your primary pump and installing tee fittings at both points.
Use your utility knife or a pipe cutter to make clean cuts in the water hose. Slide hose clamps onto each cut end before fitting. Push the tee fittings firmly into the hose ends, then tighten the clamps securely. Wrap any threaded connections with Teflon tape before assembly to prevent leaks.
Therefore, you will now have two outlet ports from the inlet tee and two inlet ports into the outlet tee. One set connects to the primary pump, and the other set will connect to your backup pump.
Step 3: Mount the Backup Pump
Place your rubber or foam dampening pad in the chosen location. Set the backup pump on top of it and mark the mounting holes. Drill pilot holes and screw the pump down firmly. The pump should not wobble or shift when you push against it.
Additionally, make sure the pump is oriented correctly. Most 12-volt demand pumps have an inlet and outlet port clearly labeled. The inlet side faces the water tank, and the outlet side faces your fixtures. Installing it backwards will damage the pump and prevent water flow.
Step 4: Connect the Water Lines
Cut lengths of fresh water hose to connect the backup pump to the tee fittings you installed in Step 2. Keep the hose runs as short and straight as possible. Avoid sharp bends that could restrict flow or cause kinking over time.
Attach the hose to the pump ports using hose barb fittings and clamps. Tighten all clamps firmly but do not overtighten, as this can crack plastic fittings. Once connected, check every joint carefully before moving on.
Step 5: Install the Transfer Switch
A transfer switch is what allows you to choose between your primary and backup pump. A manual toggle switch mounted in an accessible panel works perfectly. However, if you prefer automation, an automatic pressure-sensing switch will detect when the primary pump fails and activate the backup without any input from you.
Mount the transfer switch in a location you can reach easily from the living area of the motorhome. This could be inside a cabinet, on a control panel, or near the pump compartment door. Label it clearly so anyone traveling with you can use it in an emergency.
Step 6: Wire the Backup Pump
Run your 12-volt wire from the coach battery or an appropriate fused circuit to the transfer switch, and then on to the backup pump. Use wire that is rated for the pump’s current draw. Check the pump specifications for the exact amperage.
Install an inline fuse holder as close to the power source as possible. This protects the wiring from shorts and overloads. Crimp all connections securely and cover them with heat-shrink tubing. Loose connections are the most common cause of electrical problems in motorhome installations.
Additionally, use cable clips and zip ties to secure all wiring along the route. Wires that hang loose can chafe against metal edges over time, leading to shorts and potentially dangerous sparks.
Step 7: Test the System
Once all connections are complete, restore the water supply and reconnect the battery. Switch the transfer switch to the backup pump position. Turn on a tap and check for water flow and consistent pressure. Walk the entire water line route and inspect every connection point for leaks.
If you see any dripping, tighten the clamp or reapply Teflon tape to the fitting. Additionally, check the electrical connections with your multimeter to confirm voltage is correct. A reading below 12 volts may indicate a poor connection or an undersized wire.
Once satisfied, switch back to the primary pump and confirm that it still works correctly. You now have a fully functional backup water system installed and ready for any emergency.
Maintenance Tips to Keep Both Pumps Ready
Installing a backup pump is only half the job. Keeping both pumps in good condition ensures they will work when you need them most.
- Run the backup pump for a few minutes every month to keep the diaphragm supple and the motor lubricated.
- Inspect all hose connections every three to six months for signs of cracking, swelling, or leaks.
- Replace the inline fuse if it ever blows, and investigate the cause before restoring power.
- Winterize both pumps if storing your motorhome in cold temperatures to prevent freeze damage.
- Keep a spare pump on board for very long trips. A backup to the backup is never a bad idea for extended remote travel.
Additionally, keep a log of when each pump was last serviced or tested. This simple habit makes it easy to stay on schedule and catch potential problems early.
Common Mistakes to Avoid During Installation
Even experienced DIYers can make mistakes during a pump installation. Knowing what to watch out for saves you time and prevents leaks or electrical faults.
One of the most common mistakes is using the wrong hose type. Always use fresh water rated tubing. Do not substitute garden hose or irrigation tubing, as these can leach chemicals into your drinking water.
Another frequent error is skipping the Teflon tape on threaded fittings. Even a small thread gap will drip over time. Therefore, tape every threaded connection before assembly.
Additionally, many people forget to check the pump flow direction. An incorrectly oriented pump will either not prime or run in reverse, damaging the internal valves. Always double-check the inlet and outlet labels before tightening connections.
Conclusion
Installing a backup motorhome water pump is one of the most practical upgrades you can make to your rig. It takes a few hours of work and a modest investment in parts. However, the protection it offers against pump failure far outweighs the effort.
By understanding how your water system works, choosing the right location, and following the step-by-step installation process, you can complete this job confidently. Additionally, regular maintenance of both pumps ensures they stay ready for any situation you encounter on the road.
Therefore, do not wait until your primary pump fails in the middle of nowhere. Install your backup pump before your next trip. It is a simple, smart decision that makes every journey safer and more enjoyable.
Frequently Asked Questions
1. What size water pump do I need for a motorhome backup system?
Most motorhome water systems operate between 35 and 55 PSI. Your backup pump should match this range. Additionally, check the flow rate, which is measured in gallons per minute. A pump rated at 3 to 4 gallons per minute is sufficient for most standard motorhome setups. Always match the backup pump specifications as closely as possible to your primary pump.
2. Can I install a backup water pump myself, or do I need a professional?
Many motorhome owners install backup water pumps themselves with basic tools and a good guide. The plumbing connections are straightforward, and the 12-volt electrical work is manageable for most DIYers. However, if you are not comfortable working with low-voltage wiring, it is always a good idea to have a qualified RV technician complete or inspect the electrical portion of the installation.
3. How do I know when to switch to my backup pump?
The most obvious sign is a loss of water pressure at your taps while the primary pump is switched on. You may also hear the primary pump running continuously without building pressure, which indicates a failed diaphragm or pressure switch. Additionally, some motorhome owners install a simple pressure gauge near the pump to make monitoring easier.
4. Will running two pumps at the same time cause any damage?
Running both pumps simultaneously is not recommended. It can cause pressure conflicts and accelerate wear on both units. The transfer switch is specifically designed to ensure only one pump operates at a time. Therefore, always confirm the switch is set to one pump or the other before operating your water system.
5. How long does a motorhome water pump typically last?
A quality 12-volt motorhome water pump generally lasts between three and seven years with regular use. However, lifespan depends heavily on water quality, frequency of use, and maintenance. Hard water with high mineral content can clog the diaphragm faster. Therefore, running a water filter on the inlet line and inspecting the pump annually will help extend its working life significantly.
Related Topics:
Troubleshoot Common Campervan Issues Easily: Expert Tips to Keep You on the Road
Master Your Mobile Hub: The Ultimate Guide to RV Garage Organization for Storage and Repairs